Here are the instruction for #s 7-10 of the simple backgroounds
Experiment with different colours and see what you can come up with. There are no limits to what you can do with a bit of glue some paint and paper. Have Fun. |
|
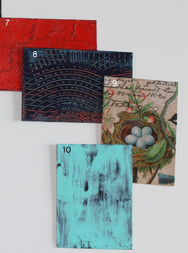
#7
Tissue paper & paint.
Tear facial tissues into pieces, tear as many as you think you might need for the size of your project plus 1 or 2 more. Brush a coat of watered down PVA glue (3 parts glue - 1 part water) over the background and lay down pieces of torn tissue, use more glue over to wet the tissue to make it stick; make sure the tissue scrunches up to give nice detail. Don’t brush too hard just float on the glue or your tissue will disintegrate. Continue until the background is covered, fill any gaps with remaining tissue.
When tissue is completely dry paint the background with acrylic paint. Once the paint is dry take a 50cm piece of black or contrasting oil pastel and gently rub over the whole area to bring out the detail.
8. Credit Card and Tupperware Cake Decorator
Squirt paint onto the project area, I used red and blue. With the credit card smooth the paint over the entire area mixing the colours in some places, the paint should be quite thick. I used a cake decorating tool but you can make a serrated tool from cardboard and comb throughthe paint in random stroked or a pattern, whatever takes you’re fancy until you get your desired effect. Remove excess paint from the comb as it builds up.
9. Serviette and Glad wrap
You can very quickly make a nice serviette into a picture by ironing it on to a piece of Card using gladwrap and an electric iron. I must say the only time my iron gets used these days is in my studio. Cut a piece of card the size of your serviette picture. Peel the layers of serviette so you only have the 1 layer of picture left. Cut a piece of gladwrap a couple of inches larger all around as your card. Place a large sheet of plain paper or baking paper on your work surface, put your card down on the paper first, then the piece of gladwrap and on top of that the serviette. Make sure it is lined up nicely with the card. Fold the sheet of paper over the top of the serviette and iron with a hot iron. Be careful not to move the layers underneath Check if the serviette has stuck completely or continue ironing Trim any excess serviette from around the edges with sharp scissors.
10. Paint & PVA Glue
Paint your background the desired colour, leave to dry. Either brush or use credit card technique to put a thick layer of PVA glue over entire background. While still wet brush on a layer of contrasting paint. As the glue and paint dries it will crack, craze & slide. You get a different effect each time with this technique.
